Installing OctaiPipe from the Azure Marketplace#
If you wish to deploy the OctaiPipe device management infrastructure to your own tennant in Azure then you can use our approved Azure Marketplace application to create all of the required resources.
In order to use the Azure Marketplace application you will first need to create a Service Principal in your Azure Active Directory and then provide the application with the required credentials. The permissions delegated to the Service Principal are solely used by the managed application for installation purposes and can be removed once the application has been deployed. However the Service Principal will need to be retained to enable user authentication for the application.
Prerequisites:
To create the managed application you will require the Managed Application Contributor role in the subscription.
To allow the necessary resources to be created within your subscription you need to register the required resource providers as described here: Azure resource providers and types. The required resource providers are Microsoft.Compute, Microsoft.Storage and Microsoft.Network.
To create the resource group you will require the Managed Application Contributor role in the subscription.
To create the Service Principal and assign it the role of Application Administrator, you will require the role of Role Based Access Control Administrator.
Create a Service Principal in your Azure Active Directory:
Navigate to App Registrations in the portal.
Click on New registration.
Name the Service Principal (e.g., OctaiPipe-Admin).
For Supported account types, if unsure we recommend selecting Single tenant.
You can skip setting a Redirect URI.
Click Register.
Generate Client Secret:
Go to the newly created Service Principal.
Select Certificates & secrets.
Create a new client secret.
Note down the client secret for later.
(Optional) Assign email notification permissions:
Select API permissions.
Click on Add a permission.
Select Microsoft Graph.
Select Application permissions.
Search for and then select Mail.Send.
Search for and then select User.Read.All.
Click on Add permissions.
Grant the required admin consent for the permissions.
Assign Cloud Application Administrator role to the Service Principal:
Visit Entra Id > Roles and Administrators.
Select the Cloud Application Administrator role.
Click on Add assignment to add the Service Principal.
Create a User Group:
Navigate back to Entra Id > Groups.
Create a new group with assigned membership type.
Group Type as Security.
Set the Service Principal as the owner.
Add all users who will be using or managing the OctaiPipe application to the group.
Note down the Group Id.
Create a new Azure Marketplace application:
Visit the Azure Marketplace application.
Click on Create.
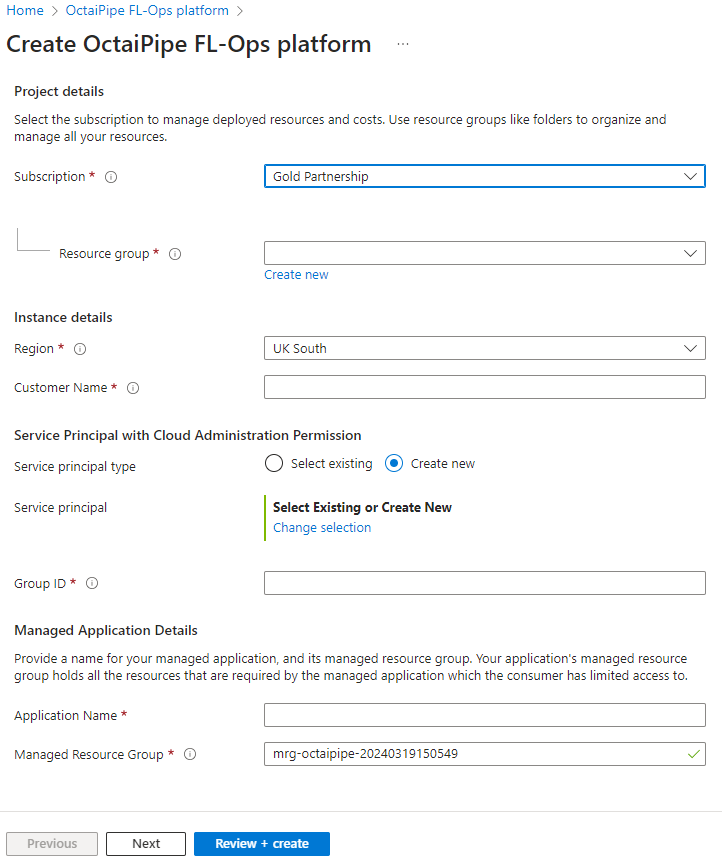
- Fill in the required details:
Subscription: Select the subscription you wish to use. This in which the resources will be created and billed.
Resource Group: Create a new resource group or select an existing one. This is the resource group the managed application will be created in.
Region: Select the region you wish to deploy to. This should be the region closest to your users.
Customer Name: The name of your organisation. This will determine the deployment URL of the OctaiPipe Portal.
Service Principal: Select the Service Principal you created. This will be used during setup to create the necessary resources.
Client Secret: The client secret generated earlier. This is required to authenticate the Service Principal.
Group Id: The Id of the user group created earlier. This will be used to manage access to the application.
VM Sizes: The size of VMs underlying the two Kubernetes nodepools. Details below.
Application Name: The name of the managed application that will be created.
Managed Resource Group: The name of the resource group to be created. To avoid conflicts, we recommend using the default name. Resources used by the managed application will be created here.
Proceed to Review + Create.
Read and agree to the terms, then select Create to set up the infrastructure.
Selecting VM size for Kubernetes
There is an option to select VM sizes for the Kubernetes nodepools. The defaults set should work for most users. However, if the default VM sizes are not available for your subscription or you need different VM sizes, this can be configured here. The General VMs will be used to host the underlying Kubernetes and kubeflow resources, while the Nodepool VMs will be used to spin up Jupyter Notebooks. If you want Jupyter Notebooks with more RAM or CPU, you can select VMs with larger contraints than the defaults.
Make sure that VM sizes are within your Quotas for compute for the region you are deploying to and that you use VM sizes that are available in your region.
The suggested initial quota limits are:
vCPU: 30Standard D2as: 20Standard A2: 10These limits provide sufficient headroom for the OctaiPipe installation and will incur no charges unless the resources are actually provisioned. You may need to increase quotas further after installation if there are multiple simultaneous users.
If you do not see any default compute, it is most likely because your subscription or the region you are deploying into does not have access to the default compute we use for OctaiPipe. Our default compute are:
For System: Standard_A2_v2 (2 vCPU, 4GB RAM)For Portal: Standard_A2_v2 (2 vCPU, 4GB RAM)For Kubeflow: Standard_D2as_v4 (2 vCPU, 8GB RAM)For Notebooks: Standard_D2as_v4 (2 vCPU, 8GB RAM)For further details on Azure VM sizes, see the Azure VM size documentation.To see available VM sizes for your subscription, see the Azure VM availability documentation.

The marketplace deployment will take approximately 1 hour to complete. Once the deployment is complete you will be able to access the OctaiPipe Portal UI at the URL https://app.{Customer Name}.octaipipe.ai.
Grant admin consent to the service principal:
As part of the installation process, the service principal will delegate permissions to the managed identity used by the application. To allow these permissions to be assumed you will need to grant admin consent to the service principal. This can be done by an administrator in the Azure portal:
Visit Enterprise Applications.
Select the newly created application.
Click on API permissions.
Click on Grant admin consent.