Federated Learning#
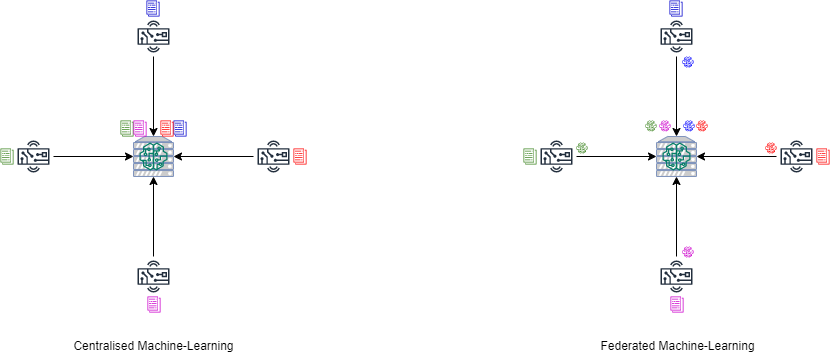
Federated learning, or FL, is a new machine-learning paradigm introduced by Google in 2016. It can effectively avoid privacy issues of the data. If one had to train a machine learning model in the past, we have to collect available data and train it in a centralised manner. With federated learning, edge devices upload their local training model to the server instead of uploading their data to a centralised location. The FL server aggregates these local models to create an aggregated global model. The high-level comparison between these two methods is illustrated using the figure below.
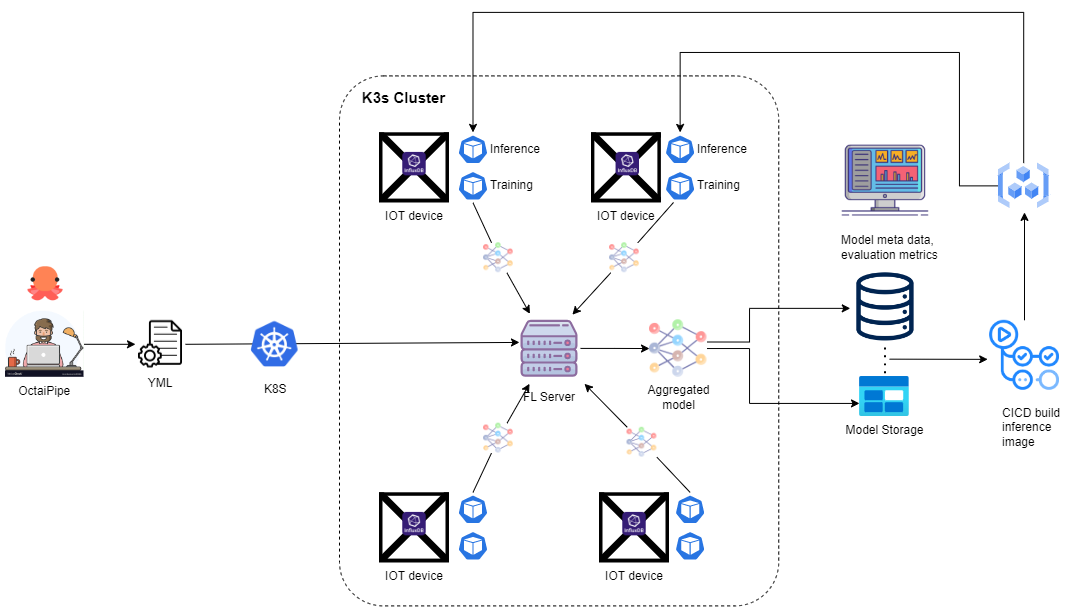
Typical FL training involves the following steps.
A machine-learning process triggers deployment of the FL server.
The FL Server randomly requests available devices or FL clients to perform machine learning processes using their own local data to create the own local model. These local models are initially based on the global model sent from the FL Server.
Once training is completed, these selected FL client push their local model to the FL server.
The FL server aggregates another version of the global model when receiving the required number of local models. The aggregation rule is based on the strategy defined by the user.
The FL server starts another round of training by randomly requesting available devices using the latest global model.
The FL training process terminates after a certain rounds of training.
From the process above, we may notice some keys to FL. These are
FL infrastructure, including devices and FL server.
The device selection algorithm.
The model aggregation algorithm.
The neural network model for this experiment.
You may notice FL can also consider machine learning as part of the pipeline, which makes it perfect for using Octaipipe.
To perform FL using Octaipipe, like other available machine learning such as AutoML, we use YML to define the FL infrastructure and its respective processes. Device selection and model aggregation are referred to as the “strategy” in Octaipipe, which we can define using a pythonic interface, normally via a jupyter notebook in OctaiLab. Similar to the strategy, one may use a predefined neural network model provided by OctaiPipe or define your own using a code-based pythonic method.
Since FL is one of Octaipipe’s features, you can easily conduct FL as one of many steps in the pipeline that Octaipipe offers. Hence, this user manual introduces how to perform FL using OctaiPipe. We start from the prerequisites needed when one would like to use FL with Octaipipe. After that, the required steps and their details are discussed. And we end with the programmer’s guide in related libraries.
Prerequisites#
Some essential steps have to complete before performing federated learning.
Collect and register device information with Octaipipe.
Prepare yaml configuration for FL and related pipeline.
Steps and Results#
To properly perform FL using Octaipipe, there are several essential processes. These processes will lead to the creation of a machine-learning model. All begin with the registration of the devices. After that, a definition file is required before deploying respective container images. Once the container image is deployed to each device, one can start the federated learning task with a simple command. The information of each process will be stored in the database, which is the summary report in Octaipipe. And as always, a machine-learning model will be created when the learning process is completed. In the following section, we will describe these in detail.
Device Registration#
This is the first step of any FL experiment using Octaipipe. Please refer to Register a Device for more details.
FL Server Deployment#
Once devices are registered in Octaipipe, we use “kubectl” under the hood to deploy the k8s server. This server plays an important role. It can deploy container images and the FL Server, which aggregates models from selected edge devices. Octaipipe has already provided this feature to create the server for you. All you need to do is to prepare a YAML configuration file and use octaifl.run() to deploy. You can turn log output off by setting the stream_logs argument to False, octaifl.run(stream_logs=False).
Define Pipeline Steps for FL#
After devices have been properly registered and initialised, the next step is to provide FL specifications. An FL specification can be described by its infrastructure, typical OctaiPipe configurations relating to input, output and training specs as well as the FL specific aggregation strategy. We will demonstrate how to perform federated learning in Octaipipe and being by discussing the YML below.
 1 name: federated_learning
 2
 3 infrastructure:
 4   device_ids: [FL-01, FL-02, FL-03, FL-04]
 5   device_groups: [group_1]
 6   image_tag: 2.5.0
 7   env:
 8     ENV_VAR_0: value_0
 9     ENV_VAR_1: value_1
10
11 strategy:
12   fraction_fit: 1.0
13   fraction_evaluate: 1.0
14   min_fit_clients: 2
15   min_evaluate_clients: 2
16   min_available_clients: 2
17   evaluate_metrics_aggregation_fn: weighted_average
18   num_rounds: 10
19   initial_model: None
20   save_best_model: true
21
22 input_data_specs:
23   default:
24     - datastore_type: influxdb
25       settings:
26         query_type: dataframe
27         query_template_path: ./configs/data/influx_query_def.txt
28         query_config:
29           start: "2022-11-10T00:00:00.000Z"
30           stop: "2022-11-11T00:00:00.000Z"
31           bucket: cmapss-bucket
32           measurement: sensors-raw
33   FL-dev-01:
34     - datastore_type: influxdb
35       settings:
36         query_type: dataframe
37         query_template_path: ./configs/data/influx_query_def.txt
38         query_config:
39           start: "2022-11-10T00:00:00.000Z"
40           stop: "2022-11-11T00:00:00.000Z"
41           bucket: cmapss-bucket
42           measurement: sensors-raw
43
44 evaluation_data_specs:
45   default:
46     - datastore_type: influxdb
47       settings:
48         query_type: dataframe
49         query_template_path: ./configs/data/influx_query_eval.txt
50         query_config:
51           start: "2022-11-10T00:00:00.000Z"
52           stop: "2022-11-11T00:00:00.000Z"
53           bucket: cmapss-bucket
54           measurement: sensors-raw
55   FL-dev-01:
56     - datastore_type: influxdb
57       settings:
58         query_type: dataframe
59         query_template_path: ./configs/data/influx_query_eval.txt
60         query_config:
61           start: "2022-11-10T00:00:00.000Z"
62           stop: "2022-11-11T00:00:00.000Z"
63           bucket: cmapss-bucket
64           measurement: sensors-raw
65
66 model_specs:
67   type: base_torch
68   load_existing: false
69   name: test_torch
70   model_load_specs:
71     version: '000'
72   model_params:
73     loss_fn: mse
74     scaling: standard
75     metric: rmse
76     epochs: 10
77     batch_size: 32
78
79 run_specs:
80   target_label: RUL
81   cycle_id: "Machine number"
82   backend: pytorch
From the YAML above, an FL YAML consists of these blocks:
infrastructure
input_data_specs
evaluation_data_specs
model_specs
run_specs
Note
The output_data_specs block does not need to be set for Federated Learning Pipelines
and will not do anything if it is included in the YML configuration.
One needs to define input_data_specs, evaluation_data_specs to describe the
data for the FL experiment. OctaiPipe provides the feature to specify query config
for each device individually by query_config['devices']. Hence,
we would like to introduce the infrastructure, model_specs, and run_specs
in the following sections.
You can validate your config using the validate_config_file function from the
develop module of OctaiPipe’s Python Interface.
infrastructure#
From the high-level machine-learning life cycle point of view, there is no difference between centralised ML and FL. Hence, there should be no difference in the YML configuration. In fact, the only difference in YML between FL and typical ML is an additional block that has to be added to describe the infrastructure, which is not required for typical machine learning. An example of this infrastructure block is presented underneath.
1infrastructure:
2  device_ids: [FL-dev-01, FL-dev-02, FL-dev-03]
3  device_groups: [group_1]
4  image_tag: "3.2.2"
5  env:
6    ENV_VAR_0: value_0
7    ENV_VAR_1: value_1
Key |
Value Description |
Note |
Layer |
|---|---|---|---|
|
Define the following block belongs to the the infrastructure |
required field |
1 |
|
Define the FL clients of this experiment. It is a list-type variable contains edge device_ids. |
optional field |
2 |
|
|
optional field |
2 |
|
|
optional field |
2 |
|
|
optional field |
2 |
model_specs#
A typical model_specs block for an FL experiment is as shown below:
 1model_specs:
 2  type: base_pytorch
 3  load_existing: false
 4  name: test_torch
 5  model_load_specs:
 6    version: 3
 7  model_params:
 8    loss_fn: mse
 9    scaling: standard
10    metric: rmse
11    epochs: 10
12    batch_size: 32
13  custom_model:
14    file_path: ./path/to/model.py
The custom_model section is used for specifying the path to a custom model file
in your local environment. This file gets sent to the device at runtime.
The metric field can be a single metric or a list of metrics to compute.
The following metrics exist for the following model types:
Model Type |
Classification |
Regression |
|---|---|---|
PyTorch |
accuracy, balanced_accuracy, precision, recall, f1_score, matthews_cc |
rmse |
XGBoost |
Any metric found for XGBoost. See official XGBoost documentation |
|
SGD |
accuracy, balanced_accuracy, mean_accuracy, f1_score precision, recall |
mse, rmse, r2_score, mean_absolute_error |
kFED |
If no target variable set, calulates global_cluster_proportions and mean WCSS. If target variable is set, also calculates adjusted_rand_score, adjusted_mutual_info_score, homogeneity, completeness and vMeasure. |
|
FRL |
Automatically set to mean_reward, std_reward, min_reward, max_reward, mean_length |
|
run_specs#
This defines the target label, cycle id and FL Framework of the experiment. An example is shown below:
1run_specs:
2  target_label: RUL
3  cycle_id: "Machine number"
4  backend: pytorch
Key |
Value Description |
Note |
Layer |
|
The name of the label to use as the target for training the model |
required |
1 |
|
The framework to use. See documentation on frameworks. If not provided and using an FL model build into OctaiPipe, backend can be inferred. Currently: ‘pytorch’, ‘sklearn’, ‘xgboost’ |
optional |
1 |
|
The name of the column that identifies and operating cycle. The validation set is split grouped on this column if provided. |
optional |
1 |
strategy#
Octaipipe supports two federated learning (FL) strategies tailored to different types of machine learning models: one for PyTorch and scikit-learn models, and another for XGBoost models. Both of these are extensions of Flower’s built in flwr.server.strategy.FedAvg strategy. See Aggregation Strategies for more details.
These strategies incorporate specific defaults to ensure compatibility and optimal performance with their respective model types.
You will find Flower’s documentation on the built in strategy options of FedAvg in [their documentation](https://flower.ai/docs/framework/ref-api/flwr.server.strategy.FedAvg.html#fedavg). Of these only the following are supported in OctaiPipe:
For PyTorch and scikit-learn Models:#
fraction_fit (float, optional): The fraction of clients to use during training. If the specified minimum number of clients (min_fit_clients) is greater than the available fraction (fraction_fit * number of clients), then the minimum number of clients will still be sampled. The default value is 1.0.
fraction_evaluate (float, optional): The fraction of clients to use during validation. If the specified minimum number of clients (min_evaluate_clients) is greater than the available fraction (fraction_evaluate * number of clients), then the minimum number of clients will still be sampled. The default value is 1.0.
min_fit_clients (int, optional): The minimum number of clients to use during training. The default value is 2.
min_evaluate_clients (int, optional): The minimum number of clients to use during validation. The default value is 2.
min_available_clients (int, optional): The minimum total number of clients that must be available in the system. The default value is 2.
evaluate_metrics_aggregation_fn (str): Maps to a function for aggregating metrics during validation. Defaults to weighted average. Additional evaluation aggregation functions can be provided in the custom StrategyConfig class.
num_rounds (int, optional): The number of rounds to train for. The default value is 10.
round_timeout (float, optional): Time to wait until aggregation goes ahead regardless of number of clients that have sent model updates. Defaults to None, which means no timeout.
Additional Options for PyTorch and scikit-learn:
initial_model (str, optional): To initiate global model with an existing model, specify the model_id of the model here. Defaults to None.
save_best_model (bool, optional): Whether to save the model from the last or best (based on metric specified in model_specs) communication round. Defaults to False.
Defaults Options: * fraction_fit and fraction_evaluate set to 1.0: Fraction of Clients Participating in Training and Evaluation (100%) * min_fit_clients and min_evaluate_clients set to 2: Minimum Number of Clients required for both training and evaluation, with a total minimum of 2 available clients (min_available_clients) * evaluate_metrics_aggregation_fn: ‘weighted_average’: Evaluation Metrics Aggregation Function (Weighted average) * num_rounds: 10: Number of Training Rounds * round_timeout: None: No timeout, always wait for enough clients to aggregate * initial_model: None: Initial Model Weights (Can be specified; otherwise, defaults to initializing with random client model weights)
For XGBoost Models:#
fraction_fit (float, optional): The fraction of clients to use during training. If the specified minimum number of clients (min_fit_clients) is greater than the available fraction (fraction_fit * number of clients), then the minimum number of clients will still be sampled. The default value is 1.0.
fraction_evaluate (float, optional): The fraction of clients to use during validation. If the specified minimum number of clients (min_evaluate_clients) is greater than the available fraction (fraction_evaluate * number of clients), then the minimum number of clients will still be sampled. The default value is 1.0.
min_fit_clients (int, optional): The minimum number of clients to use during training. The default value is 2.
min_evaluate_clients (int, optional): The minimum number of clients to use during validation. The default value is 2.
min_available_clients (int, optional): The minimum total number of clients that must be available in the system. The default value is 2.
evaluate_metrics_aggregation_fn (str): Maps to a function for aggregating metrics during validation. Defaults to weighted average. Additional evaluation aggregation functions can be provided in the custom StrategyConfig class.
num_rounds (int, optional): The number of rounds to train for. The default value is 10.
Additional Options for PyTorch and scikit-learn:
num_local_rounds (int, optional): The number of local rounds of training to perform on the device. The default value is 1.
normalized_learning_rate (bool, optional): Whether to normalize the learning rate based on the number of samples each client contributes. The default value is False.
Default Strategy Options#
fraction_fit and fraction_evaluate set to
1.0: Fraction of clients participating in training and evaluation (100%).min_fit_clients and min_evaluate_clients set to
2: Minimum number of clients required for both training and evaluation, with a total minimum of 2 available clients (min_available_clients).evaluate_metrics_aggregation_fn:
'weighted_average'Evaluation metrics aggregation function (weighted average).num_rounds:
10Number of training rounds.num_local_rounds:
1Number of local rounds (indicating that each client will perform one round of training locally before aggregation).normalized_learning_rate:
FalseNormalized learning rate (disabled by default, but can be enabled to adjust the learning rate based on the number of samples each client contributes).
See also: Customise Strategy Parameters for how to customise a strategy.
Federated PyTorch Model#
Once the FL infrastructure and its strategy are defined, the next step is to define the neural network model. Octaipipe currently supports using PyTorch to define the neural network. In Octaipipe, one may use a code-based style to define your own PyTorch neural network model. Here, we provide the example shown below:
 1from octaipipe.model_classes.fl_aquarium.base_pytorch import BasePytorch
 2import torch.nn as nn
 3import torch.nn.functional as F
 4
 5class CustomModel(BasePytorch):
 6    def __init__(self, **kwargs):
 7        super().__init__(**kwargs)
 8    def _build_model(self, input_shape, output_shape):
 9        '''Builds model when class is initialized.
10        Args:
11            input_shape: number of columns in X.
12            output_shape: number of columns in y
13        '''
14        self.dense1 = nn.Linear(input_shape, input_shape * 2)
15        self.drop1 = nn.Dropout(p=0.5)
16        self.dense2 = nn.Linear(input_shape * 2, input_shape * 2)
17        self.drop2 = nn.Dropout(p=0.5)
18        self.dense3 = nn.Linear(input_shape * 2, output_shape)
19
20    def forward(self, x):
21        '''Defines how data is forward propagated'''
22        x = F.relu(self.dense1(x))
23        x = self.drop1(x)
24        x = F.relu(self.dense2(x))
25        x = self.drop2(x)
26        x = self.dense3(x)
27        return x
Deploy and perform FL#
Running FL works as below:
1from octaipipe.federated_learning.run_fl import OctaiFL
2
3FlYml = 'path to definition file'
4octaiFl = OctaiFL(FlYml)
5octaiFl.run()
6# octaiFl.run(stream_logs=False) # to turn off log output
The FL infrastructure should be torn down automatically at the end of the run, but if you need to tear it down manually you can use the code below:
Or using a python code-based statement.
1octaifl_teardown(deployment_id='<deployment-id>')
Summary Report and Detailed Experiment Info#
When an FL experiment starts, one may be eager to see how the FL experiment progresses.
Octaipipe offers two APIs to retrieve this information. You may retrieve summary reports
regarding the latest information or detailed information via the experiments submodule.
1import pandas as pd
2from octaipipe import experiments
3
4experiments.get_experiment_by_id('2ecab1ab')
From the code above, one may discover details about the experiment once experiment_id is known. One may issue experiments.get_experiment_by_id() to get detailed information about a specific experiment.
Detailed experiment info provides complete experiment information within the experiment’s lifespan. If an experiment has ten rounds of communication, it will provide ten detailed experiment records.
Detailed experiment info provides the following information. * experimentId * experimentDescription * date * userId * communicationRound * currentStatus * createDatetime * experimentStatus * flConfigFile * flServer * flStrategy
Machine Learning Model#
Once trained and the experiment is complete, one may be keen to use your model for inference.
Octaipipe also provides a models submodule. You may retrieve the model by
the experimentId or modelId. Here is example code to retrieve the model. Once the model
information is retrieved, one may use these to perform model inference. We suggest using
the model name and its version number while performing inference.
1from octaipipe import models
2
3models.find_models_by_experiment_id('2ecab1ab')
Generally, each communication round will create an updated model. Octaipipe also provides an API to retrieve evaluation information for these models. All you need to do is to use the EvaluationClient API. Beneath is example code to get the model evaluation information by its modelId.
1import pandas as pd
2from octaipipe_core.client.evaluation_client import EvaluationClient
3
4ev_client = EvaluationClient()
5evaluation = ev_client.get_evaluation_model_id('16826f33')
6pd.DataFrame(evaluation).sort_values('communicationRound')
Federated Learning Details#
If you want to understand the FL libraries that Octaipipe provides, please refer to the following sections for more detail.